Thursday, May 19, 2011

Day 9- Pulpotomy + Restorations

I had the best day today because it was extremely busy and I learned so much! I completed 21 restored surfaces. The restorations included many buccal cervical composite and some buccal amalgam restorations (if posterior).One patient used to dip and so had a full mouth of facial caries. He told me he has quit dipping for four years now but still has to deal with the consequences. I started on #29B and moved down to 30B and 31BD. #31 caries extended distally and as I tried to excavate the caries, the pulp was exposed and it started bleeding. We placed dycal, vitrebond and restored with IRM in order to perform pulpotomy from the occlusal. I also restored #29B and 30B with amalgam. Rubber dam was placed on #31 and access was gained for pulpotomy, located 3 canals and irrigated with NaCl. Placed a cotton roll and IRM. Pt. will be coming back for RCT soon.

I also got some experience obtaining a maxillomandibular relation record with wax bite made by the lab. The patient has had a jaw surgery so his mandibular bite was to the left of the maxillary arch. It was very difficult getting the CR but it was reproducible. I took the bite registration and wax rims to the lab and communicated with them as to what we wanted. I also asked for monoplane occlusion.

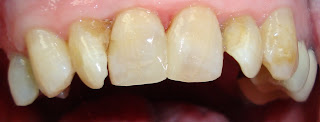
My last procedure was on an older patient who was about 80 years old, had severe back problems and could not lay down all the way. He had #8 and 9 MILF composite restorations that were loose with decay. He asked to not be put back too much because he also could not breath out of his nose. It was definitely a challenge because I also could not use much water since the patient couldn't breath out of his nose. I had to stand to do the restorations but the final result was great and the patient said he can finally smile again.
It was a great day and I loved being so busy and doing different procedures.


Wednesday, May 18, 2011

Day 8- Extraction oops

I had more scheduled appointments today. I completed a few restorations and also an extraction of #18. There were root caries present extending all the way horizontally on the distal root. As I tried elevating I noticed that the distal root was already fractured due to caries. As I used the forceps to extract, the last bit of force was released and my forceps hit the upper teeth as I was extracting the tooth. The patient said "UHH" and I accidently said "Oops". That's something that I need to work on as sometimes it is expected. I should have warned the patient better beforehand and should have never said oops as it made it seem like something bad had happened and was not comforting to the patient. A good lesson was learned at that momement. The patient was fine and glad that his tooth was out. I showed him the extent of caries and the infection around the tooth.

Tuesday, May 17, 2011

Day 7- Final Impressions for Complete dentures

Today was a great day because Dr. Schmidt had scheduled several patients for me. I saw six patients and completed 13 restored surfaces. I also had a patient who presented with mesial decay on #31M but the existing amalgam was very large and the faculty showed me how to repair the mesial amalgam without taking out the existing restoration. He used a slow handpiece round bur in addition to the spoon to excavate the caries and then packed amalgam in the preparation and used a large condenser, an explorer and hollenbeck to make it flush with the margin. Then a radiograph was taken to make sure there were no overhangs, remaining caries or excess amalgam.

I also started doing removable, taking initial impressions, and practicing final impressions after observing the faculty. I learned that overextension is usually the biggest problem with dentures and before border modling I should always check the extension of custom tray to make sure it is fully seated and not over extended past the attached gingiva. Then I used compound wax to bordermold and polysulfide impression material for the final impression.

This photograph shows custom trays that have been border molded with green stick compound. The compound is softened with heat and applied to the border of the tray.


Then used Permlastic- Rubber Base, Regular Polysulfide Impression material for the final impression.

PermlasticPermlastic - Standard Package, Regular


Monday, May 16, 2011

Day 6- Amalgambond Plus

I extracted two canines today #22 and 27. Learned that I should not do much buccal/lingual movements but most should be just rotation due to the conical root shape.
Also it was brought to my attention that I should not be wearing any rings during oral surgery ;)

Next, I restored tooth #4 MO.
Dr. Snyder demonstrated how to use amalgambond plus

AMALGAMBOND® Plus


Intended Use:
  • Retention of direct amalgam
  • Tx and prevention of sensitivity
  • Capping small vital exposures
Directions:
  • Prepare cavity for amalgam. Clean and lightly dry preparation
  • Dispense 1 or 2 drops of DENTIN ACTIVATOR (A) into mixing well. Apply to exposed dentin for 10 seconds. Wash and dry.
  • Brush a thin layer of ADHESIVE AGENT (AA) onto activated dentin surfaces. Air thin.
  • Dispense 2 drops of BASE (B) and 1 drop of CATALYST (C) into a clean, dry mixing well. Mix thoroughly and brush a thin, even layer onto dentin.
  • When placing amalgam, begin condensation immediately, before adhesive dries.
AMALGAMBOND® Plus

Friday, May 13, 2011

Day 5- Tori Removal


Remount of Full U/L Dentures

Observed complete denture delivery. Pt. returns after recent mandibular denture reline and complains of teeth not touching properly while eating. A new bite registration was taken and sent to lab for remount and re-equilibration.

The mandibular ridges were extremely flat (see top left image) and the patient had a class III skeletal jaw relationship so it was very difficult to get a reproducible bite.


Mandibular Tori Removal
A pt presented with a fractured #29 and need for a lower partial denture. Discussed mandibular tori removal at time of extraction. Patient consented to procedures.
Opened up a flap and extracted tooth #29, observed faculty remove left mandibular tori. Then, I removed right mandibular tori using a bur and lots of irrigation. The right tori was much bigger and so a conventional method was used. The tori looked somewhat similar to the following picture. Made a large mesiodistal cut going deep into the right torus- about 1-2 mm away from the apex of the tori to the point that a periosteum was used to take it off. Then used the bur again to smooth out all the areas before suturing back the flap.


Sutured bilateral tori sites with 3.0 chromic gut sutures. This was a great experience and I learned so much about flaps, tori removal and suturing techniques.

Afterwards, a dental hygienist called me for an exam.

Overall, I had a great day :)

Thursday, May 12, 2011

Day 4- Sutures & FlexiOverdentures

Practiced suturing on a towel using 4-0 silk black braided suture. Learned how to do simple interrupted, cross, horizontal mattress, and continuous sutures.

Observed a wax bite rim for lower partials. Studied for Pharm section of boards part 2.

Tooth #13 root tip
Observed extraction of #13 root tip which had been infected for about 3 years. Pt. is a substance abuser of Alcohol and Cocaine and has recently been taken off of the drugs so he started feeling pain in that area. The radiograph showed periodontal radiolucency extending all the way to adjacent teeth and distoapically to the sinus. After the extraction, much cleaning up was required to get all the infection out and a small perforation was observed on the distal. Sinus perforation precautions were taken and rx antibiotics and telling pt not to blow nose.

Fate of a tooth with an Amalgam overhang = extraction
In Dr. O'Connell's words, "What not to do"


Learned about Flexi-overdentures that was done on lower dentures with canines #22 and 27- what they look like, how it clicks in and out, and how it's done using the flexi post and ball attachment. It's very important for the patient to clean their teeth extremely well to make sure they get no caries. Pt. uses prevident at least once a day. After RCT is performed, it is allowed a week to heal and the teeth are cut as close as possible to the gingiva in order to reduce torque and also to have enough space for the vertical dimension of the dentures.

Figure 1Figure 2Figure 3Figure 4Figure 5Figure 9Figure 6Figure 12

Figure 7Figure 8Figure 10Figure 11


Observed another partial tooth try-in and discussed tx plan designs for another partial

Fuji IX - class V restoration
Learned about restoring carious abfractions with Fuji IX, using Cavity Conditioner (polyacrylic acid) first and then applying Varnish (Fuji coat LC) to smooth out the Fuji IX. Light cure and let pt. rest for 7 minutes for the fuji Ix to cure.


Wednesday, May 11, 2011

Day 3- Celebrating National Hospital & Nurses Week

There was a nice lunch celebration today at the Asheville VA for the national hospital week and national nurses week.

Here are some pictures at the celebration with the beautiful staff. I have enjoyed getting to know everybody and working with them everyday.